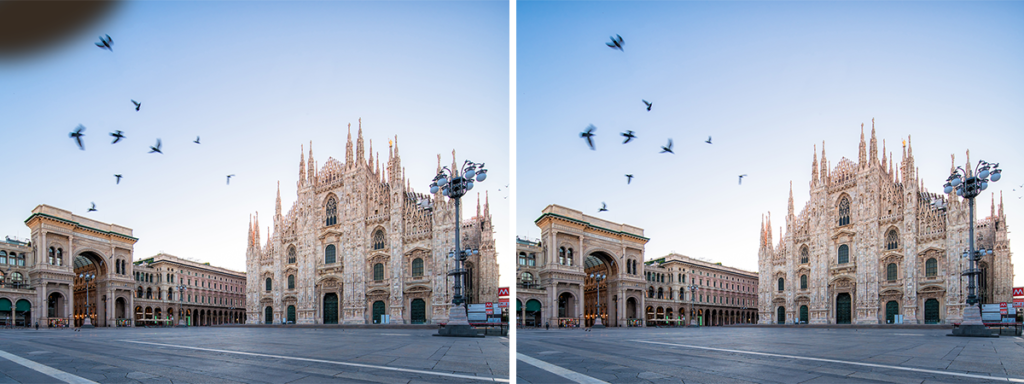
Get rid of that finger in your otherwise stunning pic with the Clone tool.
Have you ever looked at one of your photos and thought, UGH. This would be the perfect Instagram post if that hair wasn’t out of place? Or, Wow, the color combinations in this are AMAZING...if only that fence wasn’t broken...if only my thumb wasn’t in the frame…if only my sister hadn’t insisted on having her new boyfriend in all my wedding photos when we knew they were just going to break up anyway?
The list goes on and on. If any of these situations sound familiar to you, you’ll be happy to know there’s an easy way to edit something out of a picture.
PicMonkey’s Clone tool lets you “erase” parts of your photos by covering them up with details from another area in the photo. Basically, you're stamping clean sand over the stranger sitting in the sand, or stamping the blue sky over your finger in the corner.
Intrigued? Sweet! Let's get to erasing.
How to edit something out of a picture in 4 steps
You know the phrase, out of sight, out of mind? Shamelessly erase unwanted moments with Clone. When else in your life can you rewind time and recreate moments the way you wanted 'em?
Opposite to photoshopping yourself into a pic, PicMonkey's Clone tool helps you take out all unwanted photo disruptors — stray thumbs, dogs doing their business on the lawn, random passersby, construction amidst natural landscape, on and on...
We all know there's a difference between how we present online versus real life, but sometimes, picture-perfect moments don't always go as planned. Unlike adjusting photos for whiter teeth and erasing blemishes and acne, Clone's here to help you restore that almost-perfect picture by removing extraneous variables.
Here's how to do it in four simple steps.
In PicMonkey, click the Edits tab on the left menu and select Clone from the Advanced Edits group.
Click Set Source, then click an area on your image that you’ll use to cover the object you’re removing.
Click the object you’re removing, and watch the source pixels cover it. Keep clicking (try using paint strokes too) until the object is removed.
When you’re done, click Apply to save your changes. Click Download on the top toolbar to export your pic.
We know what you're thinking. The Advanced Edits do not require a Pro subscription! And no, you also don't need any design experience. It's as simple as a click of a button. Awesomeness.
Now, for the step-by-step we promised.
1. Open the Clone tool
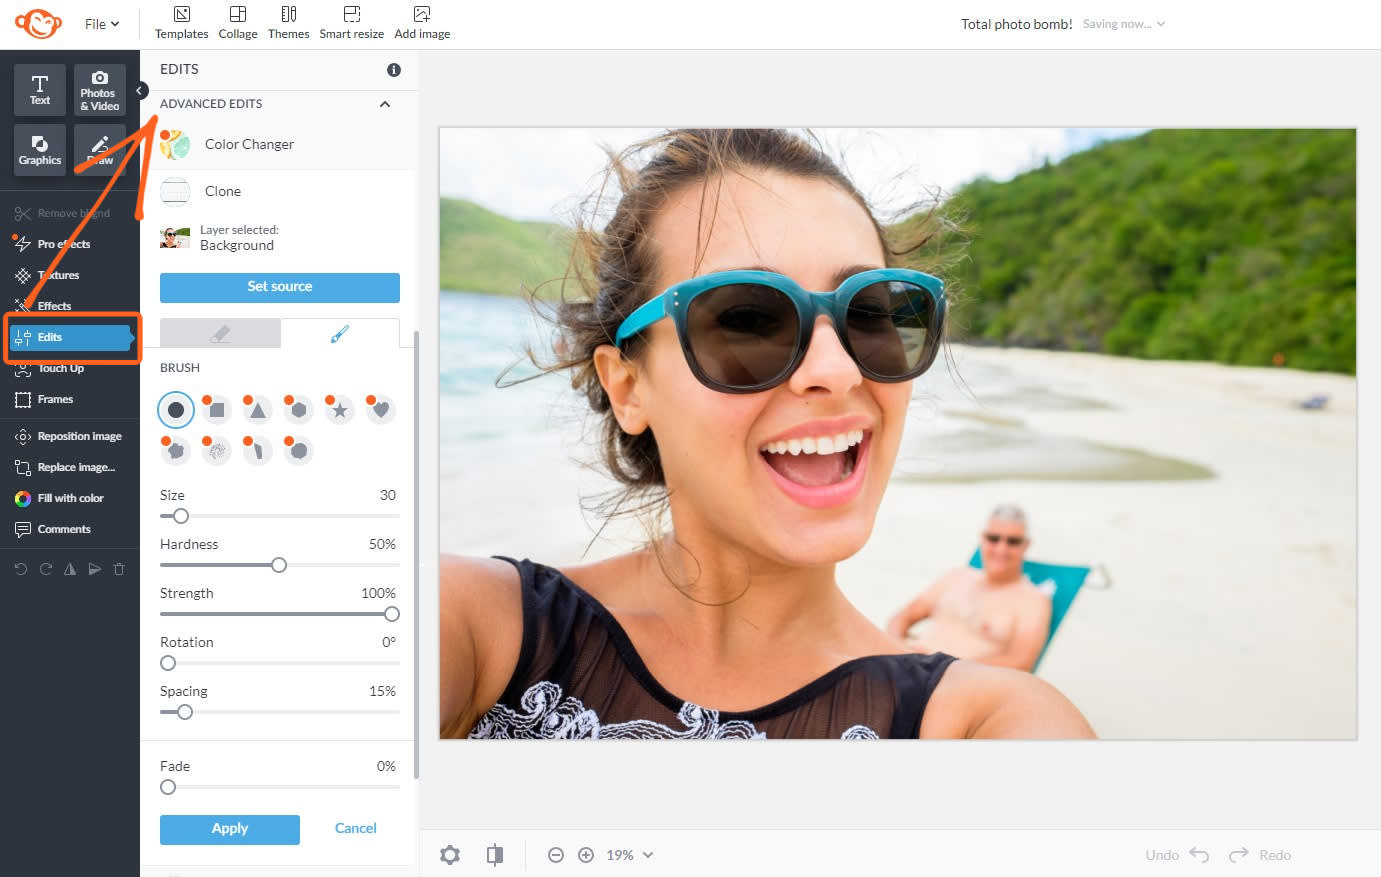
If you're ready to edit something out of a picture, simply open your image in PicMonkey. Find the Edits tab on the left. Then, under Advanced Edits, click the Clone tool. Done! (Just kidding.)
2. Select your cloning source
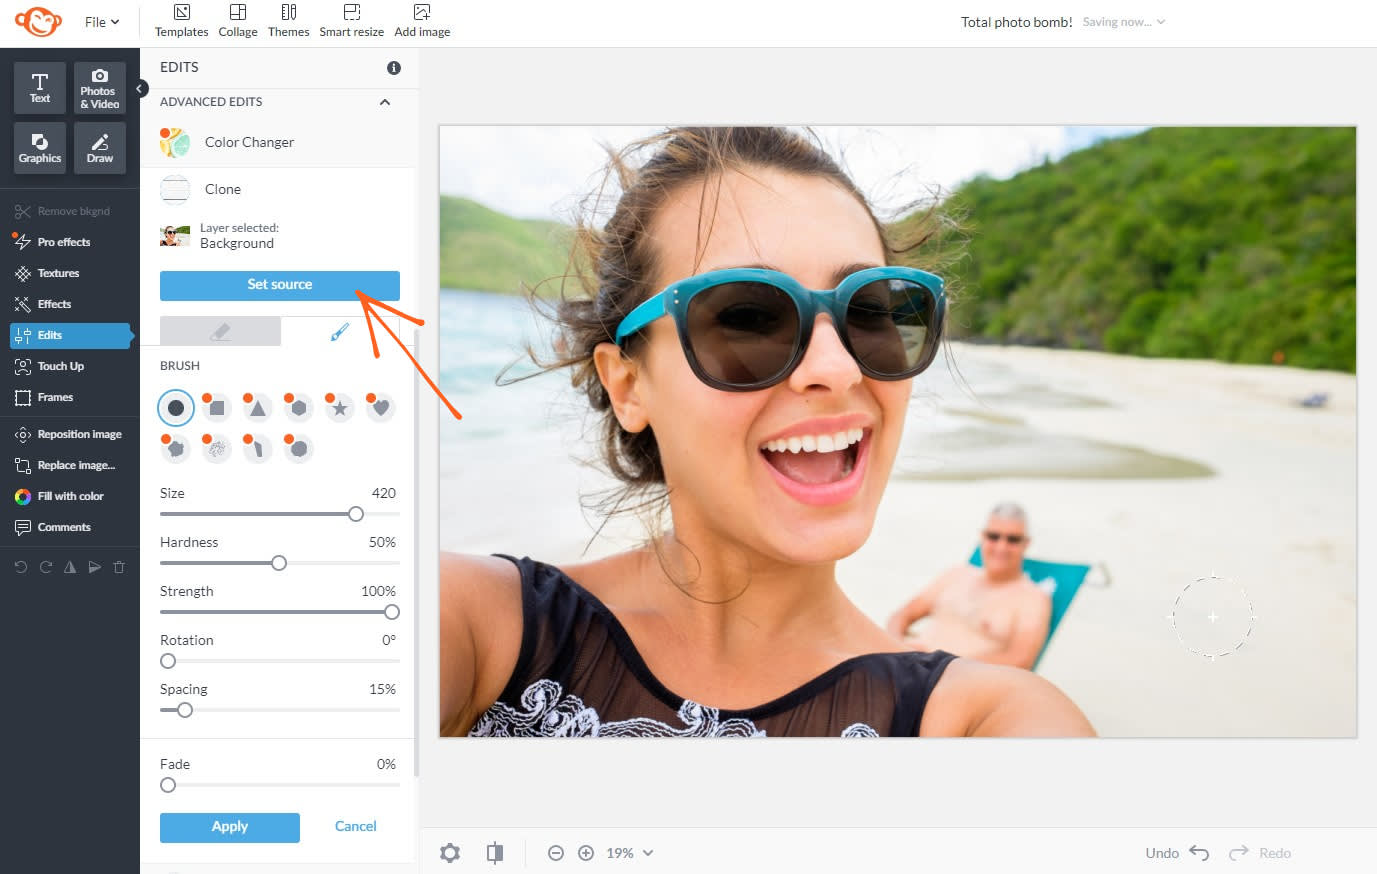
Now, for the deets. In this photo, the sand is our source for covering up Mr. Just Chillin'. Click Set source to choose the area of the photo you want to use for covering up the unwanted part of your pic.
Clone is dynamic, so when you move your brush over the new area, the source moves with it like a tagalong kid sister — whatever’s inside that source circle is gonna stamp onto the area you’re cloning.
If you’re cloning something that’s a little bit complicated — multiple tree branches, for example, as opposed to solid-colored sand — you should keep re-picking your source so that you don’t veer off and start painting over a part of the image that you want to keep.
3. Remove your imposter and adjust
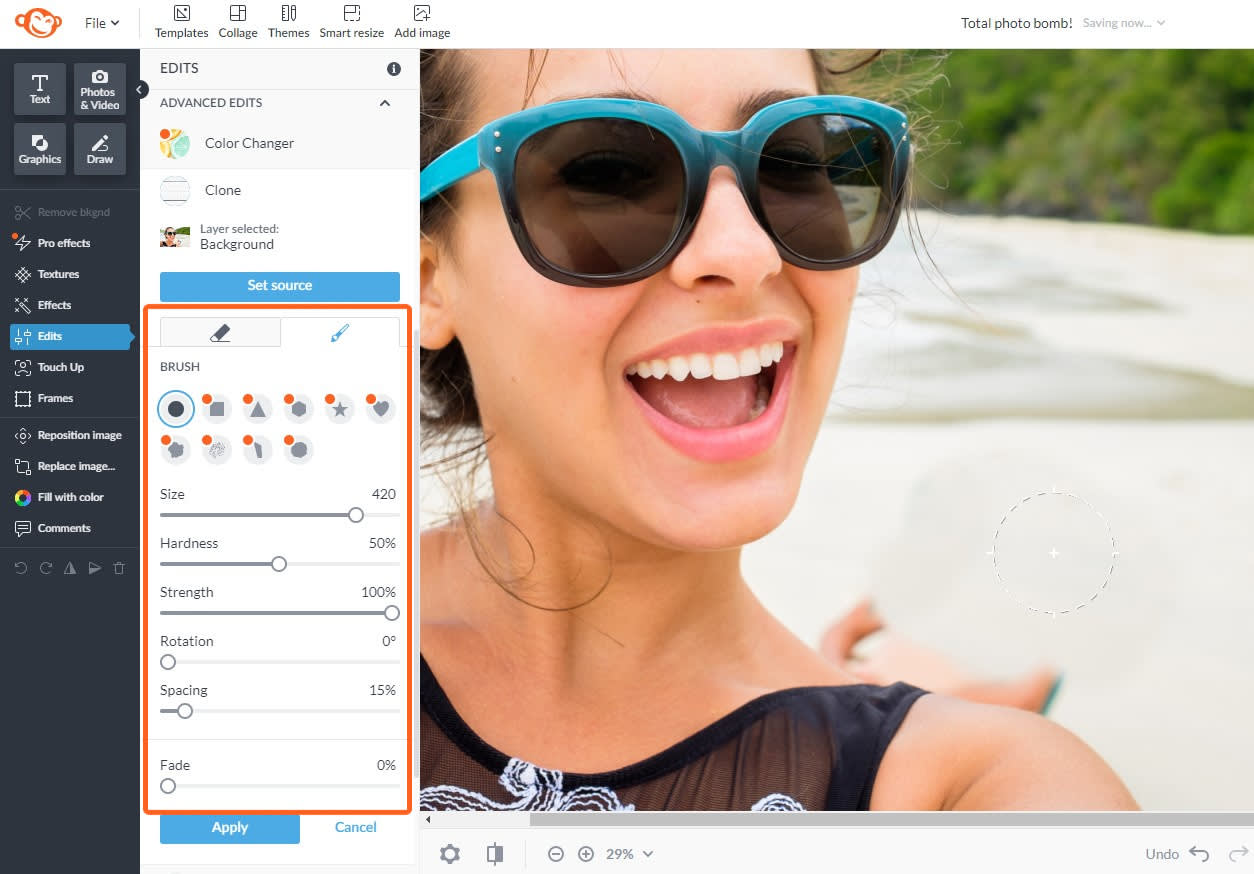
Oops! The source trailed into the wrong area and you cloned the blue chair onto the guy instead of burying him in the sand. Don’t worry if you make a mistake! You can always use the eraser to remove something that you didn’t mean to clone. Or just use the Undo arrow in the bottom toolbar to go back an action (or 20).
Plus, the Clone tool comes packed with a bunch of different control sliders. Customize Size, Hardness, Strength, Spacing, Rotation, and Fade to get the look you want.
The Hardness slider is especially useful if you're aiming for a soft touch, like when cloning grass, a cloudy sky, or someone's hair. Adjust hardness so that your cloned area is more blurry without a hard, defined edge.
4. Save and download your photo
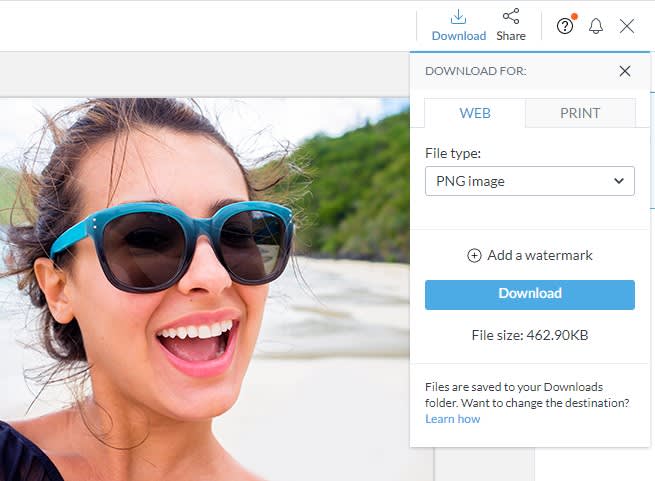
Click Apply to save your changes. If there's nothing else you want to do to your photo (it looks great, by the way), then click Download on the top toolbar.
From there, choose to export your photo as a JPG, PNG, or PDF (for Pro subscribers). Then click the big blue download button. Your image autosaves in PicMonkey's cloud storage, Hub, too, so you can always come back and re-edit it.
Here's our before and after look:

Get in on the Clone magic.
How to edit things out of pictures: tips and tricks
Clone goes above and beyond the basic photography edits we're all familiar with — exposure, lighting, contrast, saturation, and the like. Learning how to edit someone out of a picture is real deal. Plus, Clone's known for its versatility.
Here are a few more ways to use it.
1. Touch up real estate photos

Clone is perfect for editing professional photos, like real estate gems that you're putting together for your latest listing. Don't worry — we're sure that golden retriever is in plenty of other pictures...
For more on mastering the art of real estate by way of editing random happenings from your pics, check out: How to Edit Photos for Real Estate
2. Fade the cloned area for a unique finish
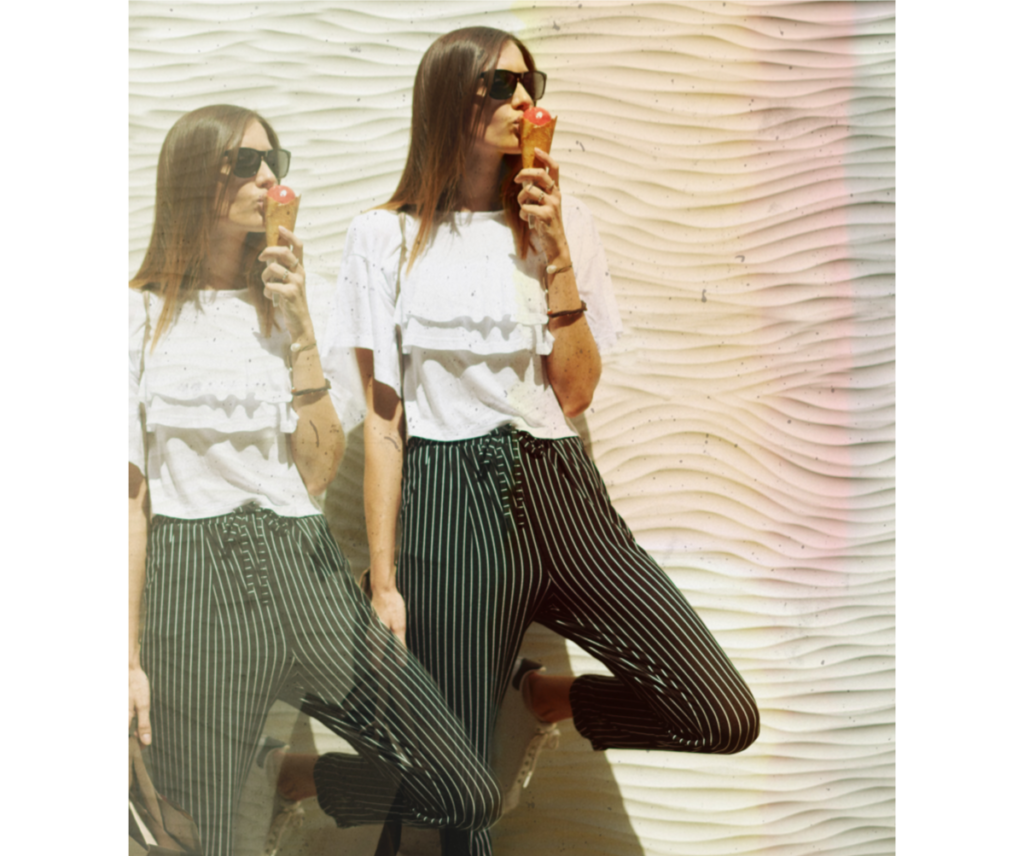
Capture this look in seconds with Pro effects.
Okay, now's the time to think about the word clone in its literal sense. Wanna see double or instantly create an identical twin? Can do!
If you’re going for something abstract or kind of trippy like a double exposure design, use the Fade slider to let part of the original image show through. We achieved this look by cloning the woman to the left of herself, then adjusting the Fade slider to make the cloned version look more transparent.
If your project is a multi-layered work of art, be sure that you’re using the Clone tool on the correct layer. If you accidentally start to clone the wrong layer, no worries, just click Cancel and the mistake won’t apply. If you're worried about doing it again, you can also lock design layers so that they can't be edited.
3. Use the zoom control for restoring old pics
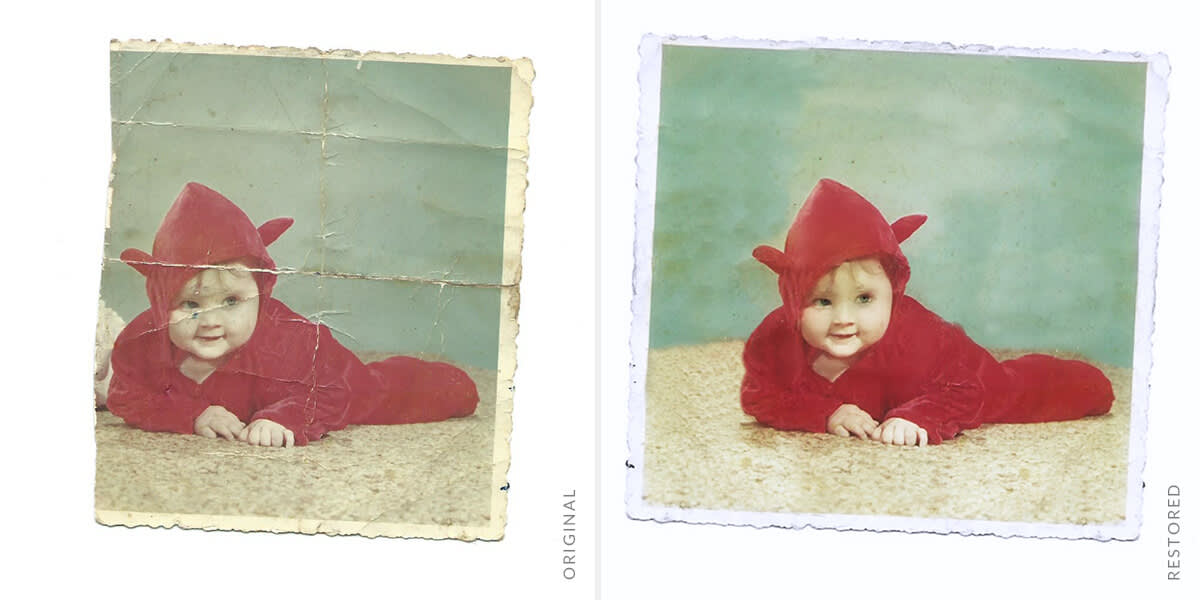
For serious, attention-to-detail jobs, zoom way in so you can clone the teensy area you’re after. A good example of when this is useful is restoring old photos, such as removing stains or crease marks from someone’s face.
Why learn how to edit things out of pictures?
While it's nice to know Clone is here for you to nix photobombers and unwanted photo invaders, there are important times to keep Clone in your back pocket.
In the workplace
Prepping a presentation and realllly need to edit out something out of a picture? If you're trying to pull something off and need to polish up some visual content, go for Clone!
Or, are you in a pinch and don't have time for a full-blown photoshoot? Have limited options for LinkedIn profile pics and need to edit out your sister posing in the background of your otherwise-handsome shot? (Sorry, Sis.) Clone it up.
Personal and professional photos
Photographers and social media influencers of the world! If taking pics is a staple to your personal or professional life, you know not every moment is controllable. Sometimes, the unexpected makes for a better picture than we could've wished for...and other times, it's an artistic disaster.
Ready to launch a carousel ad but 1 of your 10 pics just won't do? Don't scrap the whole collection! Redeem, restore, and reclaim your post with PicMonkey's Clone tool.
Artistic crises averted
Beyond improving your artistic skills with a new ally like Clone, make memories the way you remember them by editing out whatever doesn't capture your experience. 10 years from now, you might not want to remember the random kid sitting in a tree you didn't see until after the photo was taken...during your proposal.
Erase the ominous, hilarious, random, and strange from your forever memories. Congrats, Creator, you've officially mastered the wise art of learning how to edit something out of a picture. How does it feel?
For related reading on how to crop something out of a picture, check out:
